From a botanical point of view, Gloxinia Sinningia, the taxonomy of the Gesneria has changed, but among flower growers they still call their favorite flowers glosses, glosses and gloxinia. Therefore, in order not to create confusion, we will keep the outdated name, but remember that her name is Sinningia beautiful - a popular houseplant, unpretentious, flowering abundantly.
Place for gloxinium
Gloxinia is photophilous, but in direct sun it is better not to put it, especially in the flowering phase, the flowers fade quickly, and the duration of flowering is greatly reduced.
In spring, when the sun is not yet too hot, it will feel good on the southern window, but with the onset of June-July (depending on the climatic zone), the plant will need to be rearranged on the eastern or even western windows, or shaded from direct, sunlight.
I do this: as long as gloxinia grows and lays buds, it is in the brightest place, and when the first flowers bloom, I clean it in a less lit and cooler place.
Gloxinia is a plant of long daylight hours, for normal growth and development it needs 12-14 hours of lighting at least 5000LK. In low light, especially during the period of growth, plants are strongly stretched, which subsequently negatively affects the number of buds laid. They will be few, maybe not at all. After rooting the tuber and the appearance of leaves, the lighting should be as bright as possible, then the stem of the plant will be shorter, there will be a lot of buds and gloxinia will delight you with abundant flowering. The intensity of the color of future colors also depends on the illumination, in bright light the colors are saturated, and in low light the color is noticeably paler.
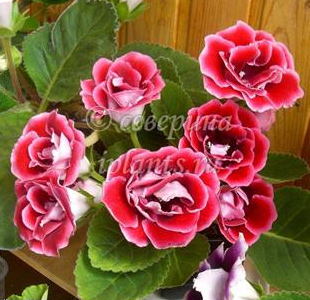 Gloxinia line 'Brocade'
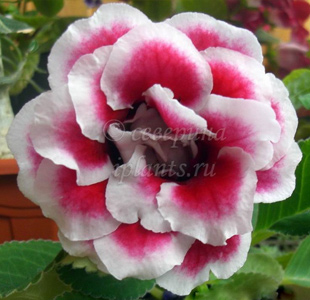 Gloxinia line 'Brocade'
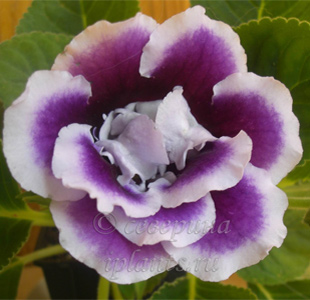 Gloxinia line 'Brocade'
Soil for gloxinium
A mixture of sheet, peat land and sand (1:1: 0.5) can be used, but the composition may be different, the main condition is that the soil is loose and breathable. Acidity pH 5.5 - 6.5, on more acidic soils gloxinium grows poorly and for this reason pure, not deoxidized peat is not suitable for it.
Before planting the plant, I strongly recommend disinfecting the soil. Now I use the drug Maxim (1 ampoule for 2 liters of water).
Wide and shallow dishes are more suitable for growing gloxinium. For young tubers, pots with a diameter of 7-10 cm are suitable, and for larger and older ones 11-15 cm. Pots can be both plastic and clay.
Planting a tuber
In February - March, less often in January (it all depends on the storage temperature), the tuber begins to germinate. If it was kept in your pot with old soil, you need to get it, clean it from the remnants of last year's roots and earth. Disinfect in pink manganese solution (30 min) or in any fungicide solution. For faster root formation, the tuber is soaked in heteroauxin solution for 18-24 hours (making sure that the solution does not get into the tuber depression ), but this is not necessary. The tuber is planted in the ground with a recess up and sprinkled with soil for no more than 1 cm. At the bottom of the pot there must be drainage (foam, expanded clay, crushed stone, etc.). The higher the pot, the more drainage (up to 1/3).
During the germination period, the tuber is always the greatest loss and they are associated with waterlogging of the soil, as a result of which the tuber rots. Since the development of the roots is preceded by the formation of the aboveground part of the watering should be very neat along the edge of the pot or into a pallet and only until the soil is easily moistened. To avoid unwanted losses, I do this:
I plant the tuber in moist soil flush with it, place the pot in a bag and put it on a light place without direct sunlight (22-25 degrees). I ventilate once a day for 10-15 minutes. After the appearance of the first pair of leaves, I open the top of the package and accustom the young plant to room conditions for 3-4 days, then remove the package completely. As the stem grows, I add soil and close the tuber for 1-2 cm. While the plant is in the bag, there is no need to water it, the soil remains evenly wet and loose, high air humidity and heat remain, the roots grow faster and there is almost no loss.
Growing temperature
At the stage of sprouting the tuber after a period of rest, it is necessary to maintain a temperature of about + 25 degrees. After rooting and with the beginning of the growth of the vegetative mass, the temperature is reduced to + 22 degrees during the day and + 18 at night. A decrease in temperature is necessary so that in low light conditions (in February-March there is not enough light) the plants do not grow too vigorously and do not stretch out. The temperature can not be reduced, but in this case the plants need to be illuminated.
During vegetation, the temperature should not drop below 18 degrees Celsius. Lower temperatures (from + 15 to + 20) slow down the growth and development of the plant. The optimal temperature for the growth and development of gloxinia ranges from + 22 to + 26 degrees.
During the period of active vegetation, a short-term increase in temperature to + 28 degrees is allowed, but at higher temperatures, few buds are formed. If the elevated temperatures last for a long time, then gloxinia begins a period of stagnation, i.e. stopping growth and development, and blooming flowers last no more than 3 days.
Thus, it can be concluded that high temperatures for gloxinia are even more destructive than excess lighting.
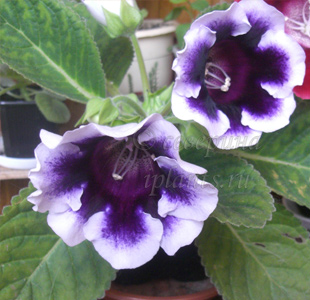 Gloxinia 'Avanti' line
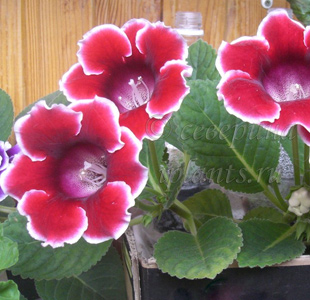 Gloxinia 'Avanti' line
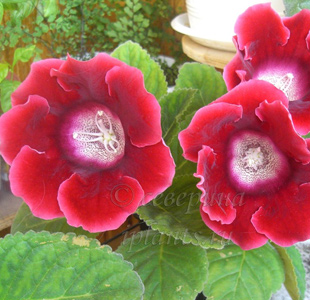 Gloxinia 'Avanti' line
Air humidity
Air humidity should be in the range of 70-80%, but gloxinia also feels good at a lower humidity of 50%, but even lower humidity is undesirable, the plant does not develop well, growth slows down and leaf deformation occurs. The edges of the leaf blade bend downward.
To increase air humidity, you can place the plant on pallets with wet expanded clay, moss, water, but the gloxinium itself cannot be sprayed because brown, dry spots are formed. However, away from light and draft, gloxinium tolerates water procedures very well. At night, you can bring it into the bathroom, sprinkle or wash it with warm water and leave it there with the doors closed and the lights off until the water on the leaves dries completely.
Watering gloxinium
For irrigation, you need to use soft water (melt, rain, filtered or partially boiled), chlorinated tap water must first be maintained for at least a day.
It is better to water from a pallet or carefully along the edge of the pot, preventing water from getting on the leaves and in the center of the tuber (where the sprouts come from) because in most cases, not from the roots, but from above, from the point of growth, the tuber rot begins. Water for watering should be warm, but if gloxinium is at a temperature of + 18 degrees, then this does not mean at all that you need to pour it with water at a temperature of + 25 degrees, nothing good will come of it. Water should be 2-3 degrees above ambient air temperature. 20-30 minutes after watering, drain the remaining water from the tray.
Between watering, you need to dry the ground with a lump .
It is necessary to reduce the frequency of watering in rainy, cloudy and cold weather.
At this time, the soil does not dry out for a long time, and roots can rot from excess moisture.
Fertilization
After planting the tuber, you do not need to feed gloxinium for the first 1.5-2 months.
Fertilizers are applied an hour after the main watering, at the edges of the pot, making sure that the solution does not fall on the leaves and at the point of growth. It is advisable to do this in cloudy weather or in the evening, so that after feeding the plant is not in the sun.
Top dressing with full mineral fertilizer, alternate with organic fertilizers every two weeks, but the first top dressing should be mineral.
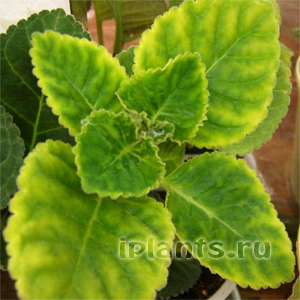 Lack of iron on gloxinia (photo by Tyday)
You can feed once every 10 days, but then make the concentration of the solution weaker.
Before the appearance of buds, organic matter is alternated with nitrogen: (potassium nitrate, ammonium nitrate)
With the advent of buds, organics are alternated with phosphorus: superphosphate, phosphoric acid potassium), if this is not done, then dormant vegetation buds will awaken, which will lead to the suspension of the normal development of the plant.
- Nitrogen fertilizers cause increased growing growth, with their excess almost no flower buds are formed. Also, excess nitrogen can cause root rot. For this reason, nitrogen fertilizers are produced only at the beginning of growth.
- Phosphorus fertilizers - enhance flowering, but theirs. excess causes premature leaf aging and leads to chlorosis of the plant.
- Potash fertilizers - improve flowering. Excess leads to the formation of shortened peduncles, yellowing of the lower leaves, deterioration of the color of flowers.
- Trace elements - affect the size of flowers, their color and the number of buds.
Organic fertilizers for tuberous flowers
Bird droppings
Litter is a very potent fertilizer and concentration should be strictly observed when using it. Pour 1 tablespoon of droppings with 2 liters of water, close with a lid and place in a warm and dark place. In the next 3-4 days, stir with a stick until fermentation begins (bubbles appear on the surface). After the fermentation process is completed (about a week), the bubbles disappear, solid particles settle to the bottom of the jar, the solution brightens. Now it is ready for use.
250 ml of the concentrated solution is poured into 1 liter of water and mixed well; plants are watered with this solution after preliminary wetting. (one hour after main irrigation).
You can just buy ready-made organic fertilizer.
Mineral dressing for tuberous flowers
for 10 l of water take:
- 10 g of simple superphosphate
- 10 g potassium chloride
- 4 g ammonium nitrate 5g
- magnesium sulphate
- 0.1 g of iron chloride
- 0.07g boric acid
- 0.004g copper sulphate
- 0.05 g manganese sulfate
- 0.008 g of zinc sulfate.
If it is not possible or too lazy to look for everything separately, then just buy phosphorus-potassium mineral fertilizer and trace elements.
I use Uniflor - flower, Uniflor-bud or Baby (dry, granulated for pepper and tomato), as phosphorus-potassium, Uniflor - growth, uniflor - green leaf, like nitrogen and Uniflor-micro, as trace elements.
After flowering, feed 2 times with potassium-phosphorus fertilizers with an interval of 14 days. This will help the tuber regain strength and survive the dormant period well.
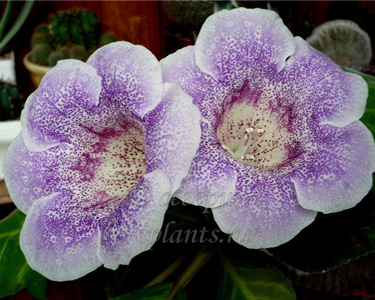 Gloxinia hybrids F1
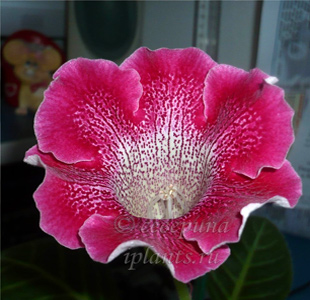 Gloxinia hybrids F1
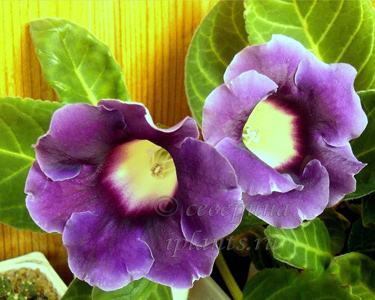 Gloxinia hybrids F1
Gloxinium blooms
In a properly grown plant, buds are laid after the third or fourth pair of leaves. Their number depends primarily on the mass of the tuber and growing conditions (light, temperature, humidity).
Gloxinia may flower repeatedly (e.g. "Avanti" and "Brocade" hybrids) if the first bloom was early. In this case, the aerial part (stem and leaves) is cut off, leaving an shoot about 2 cm high. Soon, gloxinia develop lateral shoots of the second generation (second growth) on which buds are laid, plants bloom, but not as abundantly as with primary flowering . Flowers are smaller.
Repeated flowering is not characteristic of all species and varieties of gloxinia, for example, lateral shoots of summer generation of the Kaiser Friedrich variety develop slowly, by the end of summer they manage to grow leaves, but do not enter the budding and flowering phase.
Resting period in gloxinium
In autumn, (September - October), when it will be seen that the soil after watering does not dry out for a long time, watering is reduced, and after the leaves begin to turn yellow or dry out, they stop watering altogether . After the aerial part of the plant has completely died out, the tuber goes into a state of rest, which lasts 3-4 months, depending on the storage temperature.
Tubers are stored in several ways:
- The tuber pot is placed in a cool place with a temperature of + 10 to + 15 degrees. During winter, the soil is slightly moistened several times so that the tubers do not dry out and do not shrivel much, especially if the tubers are small, they are stored worse because they dry out quickly. If the storage temperature is higher, then moisturize more often .
- 2 weeks after the above-ground mass is completely extinct, the tubers are dug up, cleaned of root debris and placed in wet sand and stored in a cool place. This method is convenient in that at any time you can easily get tubers from the sand and inspect their condition.
I store it like this: I dig up tubers, put them in damp sawdust or sand and store them on the bottom or middle shelf of the refrigerator door. Once a month I take out and examine the tubers, if the sawdust dries up, I slightly moisturize them and put the tubers there again.
According to literary data, as well as based on data from Internet resources, the storage temperature below + 8 degrees for gloxinium is destructive. In my many years of experience, I cannot agree with this, there is only + 5 in the refrigerator, but I did not have any losses. The main condition is not to moisten the substrate in which the tubers are stored, it should only be slightly wet, and the sand can be dry at all.
Gloxinium propagation
Gloxinia are easily propagated by seeds, leaf and stem cuttings, part of the leaf blade, peduncle and tuber division.
Seed reproduction mainly for species gloxinia; many young plants can be obtained at once and is not desirable for varietal and hybrid plants; splitting of traits at the genetic level can occur, which manifests itself in the appearance of the plant . There is no guarantee that you will get a plant with the original, parental characteristics.
Sowing gloxinium seeds
Sowing is carried out in late January - February (with mandatory additional illumination with fluorescent lamps) or in March.
Seeds germinate in the light, they are sown superficially on a moist substrate (the composition is the same as for planting tubers), slightly pressed against it and covered with glass or film. The plate with crops is placed in a bright place. At a temperature of 24-26 degrees, germination begins 12-14 days from the moment of sowing, at lower temperatures it drags on up to one month or even longer. Crop care is reduced to maintaining temperature and humidity, preventing drying out of the soil. If it becomes necessary to moisten the soil, then this should be done from the pallet. There is no need to water on top, the seeds are small and easy to wash off with water.
About a month after the appearance of cotyledons, the first dive can be made, especially if the crops are thickened. Dive according to the scheme 2 * 2 cm into light soil. A month later, after the appearance of the first pair of real leaves, young plants are dipped a second time or immediately planted in separate pots with a diameter of 6 cm (cactus). The temperature is maintained at least + 20 degrees . Gloxinium tolerates picking well, and after it begins to grow intensively.
I do this: if the seeds are granulated, lay them out at a distance of 4 * 4 cm from each other in order to do without picking in the cotyledons phase in the future. I put a plate with crops in a transparent box from the cake, and there they are until 1-2 pairs of real leaves appear. After that, I plant in separate pots and again put in this mini greenhouse for 2 weeks for rooting and survival. In the future, I accustom the room to open air and, if necessary, transfer to larger pots. My seedlings bloom 4-5 months after germination.
Gloxinia grown from seeds in the first year may not have a dormant period, and will grow (continue to grow) throughout the winter.
How to get gloxinium seeds
On the second day of flowering, after the flower blooms, take a soft brush and transfer the pollen to the stigma of the pestle. Repeat this procedure the next day for greater pollination assurance. If pollination has occurred, then the perianth will fall after a few days, the ovary begins to grow, and with it the receptacle noticeably thickens. The former flower, and now an immature fruit of dark green color, does not dry out for a long time. The ripening of seeds lasts 1.5-2 months and it is uneven, that is, in the box the seeds ripen at the same time. After the fruit (box) opens, bring a piece of paper and, tapping on the pedicel, shake out the seeds. After a couple of days, repeat the seed collection. Seeds are very small, dust-like. Germination is maintained for 2-3 years. Germination is good.
Normally, the plant should have no more than 3 boxes with seeds. If the plant is young or the tuber has insufficient weight and size, limit yourself to one fruit, remove unnecessary ones.
Vegetative propagation of gloxinium
Vegetative reproduction is the most common method, it is the most simple and affordable. If rooting occurs in spring or in the first half of summer, then from the resulting young plants you can see flowering in the same season.
Propagation of gloxinium by leaf cutting
In the budding phase or during flowering, the leaf of the lower tier of the rosette is cut off (young, the upper leaves should not be taken). It is desirable that the petiole is short and thick, the size of the tuber formed will depend on the diameter of the petiole. Next, you can do it in a way convenient for you:
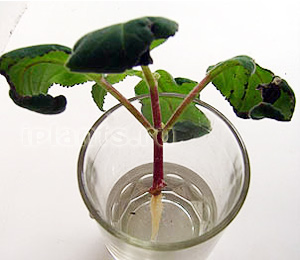
- Immerse the handle in water for 1 - 1.5 cm and keep it until the roots form (you do not need to change the water, only top it up if necessary), then plant it in the ground to a depth of 2-2.5 cm. For better survival, the handle in the ground can be covered with a jar or a bag.
- The cuttings are dipped in charcoal powder and planted in moist soil. Cover the top with a glass jar. At a temperature of at least + 22 degrees, rooting occurs within 2-3 weeks, then the jar can be removed. A little trick: if you have only one leaf, and you need to get two tubers, split the base of the petiole lengthwise to a length of 1-1.5 cm, after rooting 2 smaller nodules form.
Reproduction of gloxinium by stem cuttings
If the gloxinia tuber wakes up a lot of lateral shoots, leave 1-2, and the rest break out. Stem cuttings are essentially finished plants, but without roots. They are rooted in the same way as leaf ones and they bloom in the same season.
Propagation of gloxinium by leaf plate
- Cut a large sheet at the base of the outlet. On the back of the leaf blade, make incisions across the protruding veins in the thickest places. Put the sheet on moist soil, press it to the soil in the places of cuts and cover with a bag or place it in a greenhouse. Roots will soon appear in the incisions, and then nodules form. It is important to maintain high humidity.
- The sheet plate is cut transversely into 2-3 parts depending on the size of the sheet and each part is planted in soil or sand, covered with a jar or bag to maintain humidity. Root at a temperature of at least + 22 degrees. Optimal about + 25 .
Propagation of gloxinium by peduncle
It should be mentioned that not all varieties of gloxinium can be propagated in this way. Some varieties are well rooted by peduncles, while others do not root at all.
After the corolla has withered, the peduncle is broken out and placed in water for 1-1.5 cm and made sure that it does not touch the walls of the vessel. Do not change the water, add as it evaporates. After about a month, roots and nodules form on it. After that, the peduncle is planted in moist soil to a depth of 1.5-2 cm. Care like a leaf stalk.
Propagation of gloxinium by tuber division
Large tubers that have more than two sprouts can be divided. Tuber is cut into parts so that each of them has at least one sprout. Sections of tuber parts are sprinkled with crushed charcoal, dried for 3-4 days in a darkened place at room temperature and then planted into moist soil.
Further care is similar to caring for a whole tuber after planting.
Possible failures in growing gloxinium
No tuber has formed - this can happen when planting a very long stem stalk or if the stalk was very deeply planted and watered abundantly.
Buds turn black and die off - the cause is a lack of micronutrients and shortened daylight hours.
Redness of the leaves is a lack of phosphorus.
Yellowing of leaves - lack of nitrogen or excessive watering.
Leaf discoloration is a lack of magnesium.
Curled leaves - insufficient humidity.
Spotting (non-infectious). The leaves have yellow or brown spots of indeterminate shape - too bright lighting, drafts or pouring cold water.
Twisting flowers, slowing plant growth - temperatures below + 15 degrees.
Twisting the edges of leaves and their bending, the formation of deformed flowers and shortened pedicels - excess moisture in the soil.
Decay of petioles and buds - excessive acidity of the soil, excess nitrogen fertilizers, waterlogging of the soil.
The plant does not bloom - insufficient lighting, lack of nutrition, dry or cold air, improper maintenance during rest, excess nitrogen fertilizers.
Gloxinium diseases
- Tuber decay. Occurs with excessive watering. At the initial stage, the disease is manifested by a decrease in leaf turgor; after watering, turgor is not restored. With severe damage to the tuber, gloxinium droops completely. It is necessary to cut and re-root leaf cuttings. If the tuber does not rot from the point of growth, then the rotten parts are cut to healthy tissue, disinfected in a strong solution of manganese or other fungicide, powdered with crushed coal and dried for 2-3 days, after which they are again planted in moist soil.
- Late blight. It is the most common disease of the gesnerium family. It develops rapidly and leads to the sudden death of gloxinium. It begins with a slight wilting, then the growth of the stem stops and its color changes. After watering, the leaves wilt even more, the base of the stem begins to rot, turning to petioles and leaves. An attempt to preserve the plant is unsuccessful, the cut leaf cuttings do not root, quickly turn black and rot. The plant must be destroyed along with the earth.
- Fusariosis. The plant becomes infected through the soil. The leaves brown, curl and wilt. Dark streaks and cracks form on the stem. Excessive watering and constant soil moisture contribute to the damage of the plant with fusarium.
More Fusarium
Pests on gloxinia
Gloxinia are most commonly affected by thrips and the red spider mite.
Treat with systemic insecticides in a place protected from light and draft (spray the plant itself, spill the soil). After the moisture from the leaves of gloxinia dries completely, you can put it in place. The procedure is well tolerated.
Author of the article and photos of Severin