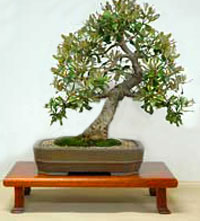
Bonsai placement
Bonsai placement depends primarily on the species of plant grown in the bonsai style. So, if you grow, for example, a fat tree, milkweed or adenium, then you need a well-lit place with some direct sunlight. Trees of cypress, rhododendron will necessarily require shading or light partial shade. I must immediately say that bonsai bought in a store are grown in so-called filtered lighting conditions, i.e. in diffused light. If you grow bonsai from trees and shrubs taken in nature, then the conditions should be as close as possible to natural ones. It means a lot of fresh air, and enough light.
The place chosen for bonsai largely determines the formation of the crown. If the plant stands one side to the light, it will lead to the development of stronger strong and leafy branches on the sunnier side. Therefore, the container must be rotated periodically so as not to disrupt the formed style. It is best if the plant receives sunbathing early in the morning - on the east window or in the evening on the west. In the period from 11 to 16 hours of the day, shading is desirable.
If, for some reason, natural light is not enough, the plant will respond well to additional illumination with daylight lamps or phytolamps. It is easy to determine the lack of light: the leaves turn to the light source, the shoots are thinner, the petioles of the leaves are longer than usual.
Do not place the container on a windswept spot or under the intense air currents of an air conditioner or fan.
Creating a traditional bonsai
What distinguishes a ficus in a pot, from the same ficus formed in the form of a bonsai? Miniature size? No, not only. As already persuaded above, signs of a century-old tree grown over the years. You can give the appearance of such a tree from a plant that is 2-3 years old, and which is 10-20 years old. It all depends on the desired thickness of the barrel. It is clear that the thicker the trunk, the older the plant. In the old plant, it is not only thickened, but also covered with bark. To own such a plant, you need to either grow it for many years, or find it in nature. The found tree is dug up, roots are cut off, part of the foliage and planted in a container .
In order to give the barrel a thickening, they resort to certain techniques. The first is that the trunk of the tree at the base is tightly pulled over with wire, but not to such an extent as to break it, but so that only the upper tissues are squeezed, and sap movement is not disturbed. When the trunk thickens above the tightened place, the wire is removed. Another technique is suitable when the barrel is too long. In the right place, the bark is cut, i.e. remove a circular strip of bark (cambium) about 1-1.5 cm, and plant the tree in a deep pot so that the place with the cut is underground. After a while, roots form at this place. Then the trunk below these roots is cut, and the plant is transplanted into a bonsai container. It can take a year to develop new roots.
Another distinction of bonsai is the roots rising above the surface of the earth. This is achieved by the fact that when transplanting, the roots are raised higher and not covered with earth. You can also form the desired shape of the roots using wire.
In nature, as a rule, on a tree, you can distinguish the main branches that grow not strictly upward, but obliquely or almost horizontally. When forming bonsai, this is achieved by trimming, when two to three main branches are left on the trunk, and they are directed using wire. In addition, the outlines of these main branches should be clearly visible, so excessive foliage interferes, the foliage is thinned, and new shoots and leaves are removed from the base of the main branches.
The final image of bonsai is given by covering the soil with natural elements. It is either covered with moss, or sprinkled with sand or gravel. How to cover the soil depends on the type of plant. So coniferous trees will look more natural on white sand, deciduous on the soil covered with moss. Succulents look beautiful on gravel .
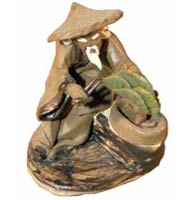
Very often, the bonsai composition is supplemented with various figures representing a Chinese peasant, a Chinese girl, a Chinese or Japanese-style house, etc.
Bonsai formation and landing
I repeat - there can be only two options for getting bonsai - if you bought an already formed bonsai, then you can only continue to look after it, maintain the created style, and if you yourself form bonsai from a suitable indoor plant or specially grown seedlings.
In any case, only healthy plants with a strong and well-developed root system, with a clearly formed line of branches, are suitable for growing bonsai. You can start forming a plant from two or three years old. All actions begin in the spring, when buds appear on the tree.
First, the bonsai style should be determined, which depends on the appearance of the plant. Sometimes difficulties with the formation of appearance are associated with the fact that a person has little idea which branches, and in which direction will begin to grow after pruning. Therefore, it is worth remembering one simple rule: shoots from the uppermost buds on shoots grow stronger and more actively. I.e. on the plant as a whole, the top stretches and bushes faster and the tree grows in height faster than in width. The lateral branches of the kidney at the ends of the shoots also grow more actively than the lower ones. If you cut off the upper kidney, it will begin to grow more actively, the one that remained lower.
All this is due to the fact that the external kidneys and leaves near them get more light. That is why buds develop more actively on the shoot, which are on the upper side of the branch and grow upward, and if we talk about the plant as a whole, then the side facing the light grows thicker and faster.
Bonsai step by step
1 step. First, we will examine the tree and remove all dry branches. As well as branches at the bottom of the trunk. We highlight three main branches on the tree crown, usually leaving those three branches, the vertices of which form an equilateral triangle. Now you need to delete all branches between the selected three .
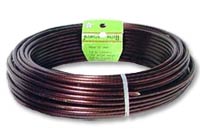
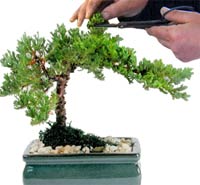
Step 2. If you want to grow an inclined tree, then you need wire, quite soft so that you can bend it with your hands, but strong enough so that it does not bend under the weight of branches and trunk.
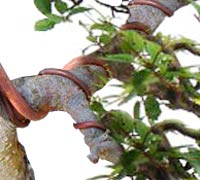
3 step. Now you need to free the upper part of the roots from the ground and gently tilt the trunk to the required extent. One end of the wire is buried and fixed in the soil at the base of the barrel on the inside of the bend. If the tree is not just inclined, but made in a cascading style, then the trunk will be bent quite strongly. Holding the trunk of the tree tightly, we wrap it with wire, which should fit quite tightly, but without injuring or tearing off the bark. The turns should not fall too rarely, so that the bent trunk does not crawl out of the turns. Thus, the trunk is wrapped to the base of the branches left. So that the crown of a tilted tree does not hang at the bottom, like a broom, the wire must support them in the right direction .
4 step. Making a turn of wire around the branch, carefully straighten thin and fragile shoots so as not to break them off. Moreover, more pieces of wire will have to be tied to the main wire, creating a frame of the desired bonsai shape. The ends of the wire can be bent down or put on pieces of a regular eraser so that they do not scratch your hands and damage the plant.
The length of the wire should be at least one and a half times the winding area. The bending angle of the wire in relation to the line of escape or the trunk determines the frequency of turns - ideally it should be 45 °. Note that forming a tree or bush with thin and delicate bark, or with fragile leaves, as well as bonsai with prickly shoots, the wire is not wrapped around the stems and trunk, but simply applied to it and fastened or tied (with woolen threads or pieces of wire in the winding).
Step 5. The tree bent in the wire should be at least 1.5-2 years. If you remove the wire earlier, the barrel can return to its original position. The wire on the branches is removed earlier than from the trunk - it is enough for 6-8 months. Forming the direction of thin and delicate branches, you cannot use ordinary wire, but you can use braided wire - the one that is usually tied by the cords of household appliances and computers.
In some rather complex forms of bonsai, in addition to the trunk and branches, the direction and shape of the roots are formed with the help of wire, usually if they bizarrely protrude above the soil surface.
6 step. When the desired shape of the plant has been achieved, you can transplant it from pot to pot. First, the drainage holes are closed with clay shards, convex side up. Then a layer of moss or chopped fern roots is laid on the bottom. Then a small layer of prepared soil mixture.
7 step. Now you need to trim the roots. To do this, first examine the root system, determining whether healthy roots - healthy roots have a light slice (white or light yellow). Damaged roots are cut. Your task is to form the root system so that it is evenly distributed in all directions.
If the root system is fibrous, i.e. has a weakly expressed central root and many small roots, then it is simply evenly pruned and rarefied. If there is a long taproot and weak lateral shoots, then additional techniques are required. First, the bottom of the root is trimmed, and the rest is formed. To do this, you can use the same wire, or U-shaped wire staples - for plants with soft and plastic roots. The root is fixed in the soil with a bracket from the edge of the plate, then bends horizontally to the center of the plate.
The prepared plant must be carefully placed in a container, spread the roots and cover the soil mixture. If there is a possibility that the trunk of the plant is not firmly held in the ground and may shift and wobble, then additional fixation is required. With the help of a peg like ordinary indoor plants, this is difficult to do, because the depth of the plate is small, so the most painless way is to fix the trunk after transplanting with heavy pebbles.
After transplantation, the plant is carefully watered. Plants with many roots removed are watered with great care at first, so as not to cause decay. Perhaps the earth will settle and compact and it will have to be added from above. When the earth settles, it will be sufficiently compacted and the stones fastening the tree can be removed.
Bonsai crown formation
The main techniques that ensure that miniature trees are shaped and maintained are pruning and pinching.
The main thing to know: pruning and pinching lead not just to branching, but to the growth of new thinner shoots with small leaves.
Pruning is the removal of large branches and shoots, carried out annually, usually in the middle or end of winter. Before cutting branches, you need to imagine the final shape of the plant, because the shoots will no longer grow in the old place like hair on a person's head. The real art of bonsai involves a long contemplation, the study of the appearance of the plant, the presentation of its shape. Each leaflet or twig deserves a "to be or not to be" thought.
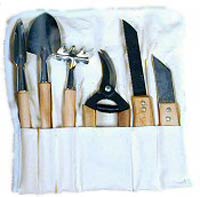
An important rule is that flowering plants are cut off only after flowering ends, most often this happens in autumn in late September - October. Accuracy in everything related to pruning - an acutely sharpened and disinfected tool is the key to health. Cut places should dry out and healed, so it is best if a garden var is prepared. A thin layer of it is not worn at the cut site. It disinfects and dries, and in addition, the cut site remains almost invisible on the bark, which allows you not to spoil the appearance. If there is no garden var, then the cut site can be sealed with a medical plaster until it cracks.
Trimming is simply trimming or shortening elongated shoots in order to maintain shape throughout the growth period. Pinching is carried out in the spring, with the growth of new shoots, it allows the crown to branch, and form the plant in the desired style.
It is the annual pinching of new shoots that provides a miniature head start for the plant. The frequency of pinching and its feasibility depend on the type of plant grown. For some trees, only spring pinching is enough, for others it will be necessary to repeatedly pinch the tops of the shoots to give the desired shape over the summer, or even throughout the year. The more often the bonsai is cut and pinched, the smaller and thicker the crown is formed .
Bonsai (potensai) formation stages
Pavel Karpenkov (beomaster) gives a brief instruction for beginners on the formation of bonsai using the example of ficus benjamin:
1. Root formation
We need to get 2 main things:
- Flat root system. Initially, a plant is chosen that can actually be transplanted into dishes wide, but low, without causing fatal injuries to the plant. Therefore, we exclude those who live with a core root and taken from nature, since I consider it inappropriate to waste time on their resuscitation after extraction. It is recommended to stop at ZKS, potted plants.
- Beautiful thick lateral roots, evenly extending from the base of the trunk with a star and visible above the soil surface (nabari). Initially, when choosing a plant, you should pay attention to the presence of those or those that can become them. Therefore, plants with root washcloth are undesirable. Usually such roots are formed in plants growing in the ground, former cuttings or diverted.
2. Barrel base
Beautiful thick lateral roots cannot move away from a thin stick. The base should have a pronounced taper when moving from the roots to the trunk itself, I'm talking about the first 2-3 cm above the surface. Having chosen the initially correct plant, in the future this most important place for visual perception will only be improved.
3. Barrel proper
Note the following:
- Runaway. The barrel should be evenly and noticeably thinned from the base to the top, while the height should not be large, approximately 15 diameters of the base will be normal for the beginning, when forming it is worth bringing this ratio to 10.
- Form. Natural curves, tilts, screw twists are always welcome and provide fantasy food when forming, unless our goal is originally an upright style or broom.
- Invoice. We strive to form a small but impressive old plant. Therefore, coarse bark, wrinkled, flaky, forming deposits, traces of overgrowth of long-cut branches, natural hollows, etc., are very good. In short, light gentle smooth is not ice. Unless we clean it specifically for contrast, but more on that later.
4. Skeletal branches
After the acquisition, the hands will immediately sweep over, and you will want to highlight the future frame with trimming. When buying, you should immediately estimate which branches will become a skeleton, they should be evenly alternating, have a thickness uniformly decreasing from the bottom up and the thickness should be commensurate with the thickness of the trunk. In short, the lower branch is the thickest and not equal in thickness to the trunk (pay attention to forks) and it is not higher than a third of the estimated height of the plant. A very important point, then it will be difficult to correct.
5. Branching structure
The skeletal branches chosen should branch well so that we can choose the second-order branches we need, so that they do not look bald, so that the internodes are short. Then, by simple pruning, you can quickly give the desired shape to the crown of each skeletal branch and the crown of the plant as a whole.
6. Leaves
- Under all other conditions, the size of the sheet plate plays an important role. Our tree will never look like an adult if the leaves are large, comparable to the diameter of a branch or God forbid the trunk. In nature, after all, old trees do not have this. There are ways to reduce the size of the leaves, but for different plants the reduction coefficient is different and there is always a limit, it is better to initially lay down into small ones.
Densification density. The leaves may be small, but rarely grow. Then the plant will always look bald.
7. Crown shape in general
This refers to the tendency to grow up or in breadth. We, of course, are better in breadth - a small spreading tree always looks more profitable than a tree with a small scope of skeletal branches. And no ligature will change this trend, so all the time it will be under wire or stretch marks, which is not good.
8. Growth rate
Subject to the above wishes, the plant itself must be fast growing, otherwise the results of formation can be expected before Japanese Easter. In this case, the trunk should thicken well. For this reason, myrtle is not suitable.